Showing posts with label Breakfast. Show all posts

Tuesday, November 4, 2014

Apple Cider Donuts

These donuts, baked – no fried – are delicious!  A reduced cider makes the apple taste concentrated and the cinnamon sugar coating takes them over the top. 

They are easy to make, and slightly cake-y and fluffy; a fantastic fall combination. 

Apple Cider Donuts – Adapted from Sally’s Baking Addiction

Ingredients

  • 1 1/4 C apple cider
  • 2 C white whole wheat flour
  • 3/4 tsp. baking powder
  • 1 tsp. baking soda
  • 1 tsp. cinnamon
  • Pinch of nutmeg
  • Pinch of cloves
  • 1/4 tsp. salt
  • 1 egg
  • 1 T olive oil
  • 1/4 C brown sugar
  • 1/4 C sugar
  • 1/2 C buttermilk
  • splash of vanilla extract
  • 4 T sugar
  • 1/2 T butter, melted
  • 1/4 tsp. cinnamon

Directions

Begin by placing the apple cider in a saucepan and bring to a boil.  Reduce the heat and simmer, uncovered for 10-15 minutes.  This process reduces the apple cider and concentrates it by boiling off the water. In the end, you’ll have about 3/4 C of the cider.  Pour the cider into a wide, shallow bowl and place in the freezer for 5-7 minutes to cool down. 

Meanwhile, mix together 2 C flour, 3/4 tsp. baking powder, 1 tsp. baking soda, 1 tsp. cinnamon, 1/4 tsp. salt and a pinch of both nutmeg and cloves.  Stir well. 

In a second bowl, combine 1 egg with 1/4 C brown sugar, 1/4 C white sugar, 1 T olive oil, 1/2 C buttermilk and a splash of vanilla.  

Pour the wet and dry ingredients together, and add in the cooled cider (starting with 1/2 C).  Stir until a smooth dough forms, adding more cider as needed.  I ended up using all 3/4 C of the reduced cider. 
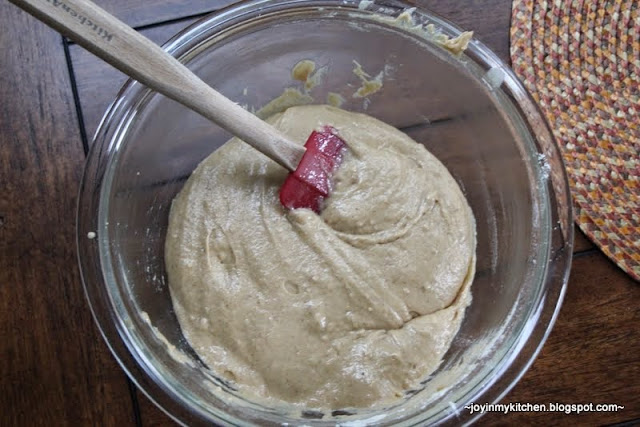
Using a spoon, or following Sally’s directions, spoon the dough into the donut pan that has been lightly greased with olive oil.  Fill the donut pan 2/3 of the way full. 

Bake at 350 for 8-10 minutes, or until the donuts bounce bake when you press them lightly with your finger, and/or they are beginning to brown. 

Remove from the tray and place on a wire cooling rack for 3-5 minutes.  Meanwhile, melt 1/2 T butter, and mix together 4 T sugar with 1/4 tsp. cinnamon.  Dip each donut into the butter, and use your hands to spread the butter around to cover the entire donut.  Dip into the sugar and cinnamon mixture. 

Serve immediately. 

This recipe makes 12 donuts; I recommend only sugar-coating them right before you eat them, so they stay fresh!  The measurements I provided for the topping cover 6 donuts, so double it if you are covering them all right away. 

Enjoy! 

Friday, September 26, 2014

Oatmeal Apple Muffins

These muffins are a hearty and tasty way to get your apple-a-day!  Power packed with antioxidants from the apple and delicious whole grains from the oats, these muffins make a great breakfast or snack. 

Drizzle with a little powdered sugar glaze, and you even have dessert. 

Regardless of how you enjoy them, you will.  They freeze wonderfully, so make a double batch so you have some around when you need them.

Oatmeal Apple Muffins – Inspired by Lynn’s Kitchen Adventure

Ingredients

  • 3 C old fashioned oats
  • 1 1/2 C milk
  • 1/3 C brown sugar
  • 1/8 C olive oil
  • 2 eggs
  • 1 tsp. cinnamon
  • 1/4 tsp. nutmeg
  • 2 tsp. baking powder
  • 1/4 tsp. salt
  • 1 medium apple, finely chopped

Directions

Begin by combining the 3 C oats with 1 1/2 C milk.  Stir well and let the mixture sit for 15 minutes.  Meanwhile, wash and chop the apple and prepare the muffin tin (n=12) with liners that have been lightly sprayed with oil. 

Next, stir in 1/3 C brown sugar, 1/8 C olive oil and 2 eggs.  Add in the 1 tsp. cinnamon and 1/4 tsp. nutmeg along with 2 tsp. baking powder and 1/4 tsp. salt.  Stir well.

At this point the muffin batter should be getting “gummy” like oatmeal does when you begin to cook it.  If it’s not starting to get thick yet, allow the mixture to sit for 5-7 minutes.  The batter will be wetter and thinner than traditional muffin batters.   

Then, add in the chopped apple. 

Stir well.

Scoop the batter into a prepared muffin cup, filling almost to the brim.  These muffins don’t rise a ton, so you don’t have to worry about getting them too full. 

Bake at 350 for 17-20 minutes, or until a toothpick inserted in the center comes out clean. 

Remove each muffin from the pan and immediately place them onto a cooling rack.

Cool for 20-30 minutes before eating, and if desired drizzle the top with a simple glaze of powdered sugar (1/4 C) and 1-2 tsp. milk. 

Enjoy!

Friday, August 1, 2014

Breakfast Stuffed Portabella Mushrooms

Earlier this week, Frog Prince and I celebrated our 7th wedding anniversary.  For our special day, I decided to make us a new breakfast to enjoy together before we headed off to work. 

Not only was it easy to make, but it was delicious and the leftovers warmed up well! 

And, it looked kind of fancy too. 

Breakfast Stuffed Portabella Mushrooms

Ingredients

  • 4 portabella mushrooms
  • 4 eggs
  • Olive oil spray
  • 1/4 C diced bell pepper
  • 1/4 C diced zucchini {optional}
  • 2 strips of bacon, cooked and crumbled
  • 4 slices of cheddar cheese
  • 1 medium Roma tomato
  • salt & pepper

Directions

Begin by removing the stems from the mushrooms and carefully using a spoon to scoop out the gills of the mushrooms.  Then, wash the mushrooms and pat them dry.  Place them on a lightly greased cookie sheet, with the cap-side down.  Season them with a pinch of salt and pepper, and if desired, garlic. 

Roast the caps at 425 for 10-12 minutes.  You may wish to flip the mushrooms over once during that time frame; I typically do not, but I know folks who do. 

Carefully spoon the liquid out of the mushrooms after roasting.  If you are prepping the night before, stop here and place the roasted mushrooms in the refrigerator over night.  If you are making them right away, reduce your oven temperature to 375. 

Place diced bell pepper and optional zucchini into the center of each mushroom.  Add the crumbled bacon. 

Top each mushroom with an egg and a slice of cheese.  Season with salt and pepper, as needed.  Slice up the Roma tomato and place slices onto the lightly greased cookie sheet to roast. 

Bake the mushrooms for 15-20 minutes, until the eggs are set and the cheese is melted and slightly browned. 

Top each egg with 1-2 slices of roasted tomato, as desired. 

Serve warm, alongside hash browns. 

Enjoy!

Wednesday, April 9, 2014

Maple and Brown Sugar Granola

We love granola around here; it's our breakfast nearly every day.  Except weekends, when we have whole wheat buttermilk waffles.


When I was a little kid, I used to love the maple and brown sugar oatmeal, and so I decided one day to tweak our favorite granola recipe by adding some maple syrup.


I took one bite after the granola was ready and happily exclaimed that it tasted just like the oatmeal I used to love.  Since then, I haven't gone back to making our old favorite granola, I just make this one!


Maple and Brown Sugar Granola

Ingredients
  • 6 C old fashioned oats (or a mixture with quick cook oats)
  • 1/2 C brown sugar
  • 1/4 C maple syrup
  • 2 T butter
  • 1/3 C water
  • 1 tsp. cinnamon
  • pinch of salt

Directions

In a large bowl, combine 6 C oats with 1 tsp. cinnamon and a pinch of salt.  Using a saucepan, melt 2 T butter, and then add in 1/3 C water, 1/2 C brown sugar and 1/4 C maple syrup.  Stir well.  Bring the mixture to a boil and stir for 1 minute.  Then, remove the mixture from the heat and set aside for 5 minutes.  

Pour the syrup mixture over the oats and stir to combine.  


Spread the granola onto a half sheet cake jelly roll pan, or two standard sized cookie sheets.  


Bake at 350 for 30 minutes, stirring every 10.  For extra crunchy granola, turn off the oven and leave the granola in the oven while it cools back down.  Stir occasionally.  You will want to be sure to watch the granola carefully during cooking until you get a feel for how your oven will bake it so that it does not burn.  


Store in an airtight container for up to 1 month, or in the freezer for longer.  But, don't worry, it won't last that long.  

Thursday, February 6, 2014

Orange Zest Cranberry Muffins

I admit it.  I really do like winter.  I think one of my favorite parts about winter is the fact that it is bright and sunny, so crisp and white. 

And, that it coincides with citrus season.  These orange zest cranberry muffins are my new mid-winter crush.  

That explains why I only have photos of them in the muffin tin. When you make them, you’ll understand why that is too.    

Orange Cranberry – from Mom

Ingredients

  • 2 C white whole wheat flour
  • 2/3 C sugar (a little under is a-ok)
  • 2 tsp. baking powder
  • 1/4 tsp. salt
  • 1 C chopped fresh or frozen cranberries
  • 2/3 C milk
  • 3-4 T melted butter
  • 1 tsp. orange zest (about 1 medium orange)
  • 1/2 tsp. vanilla
  • 1 egg

Directions

Mix the 2 C white whole wheat flour with a scant 2/3 C sugar, 2 tsp. baking powder and 1/4 tsp. salt.  Add in the cranberries and stir.

Make a well in the center of the dry ingredients and add 2/3 C milk, 3-4 T melted butter (three has worked just fine for us, but depending on the consistency of your flour, you may need to add 1 T milk to account for the liquid difference), 1 egg, 1 tsp. of orange zest and 1/2 tsp. vanilla. 

Mix the batter together; it will be very thick and sticky. 

Using a cookie scoop, scoop roughly 1/6 C of the dough into 12 greased muffin tins. 

Bake at 400 for 18 minutes, or until a toothpick in the center comes out clean. 

Cool in the tin for 1 minute, and then carefully remove the muffins to a cooling rack to cool down. 

Enjoy!

Wednesday, January 22, 2014

Cream Cheese Stuffed Waffles

The other morning I had an idea – smother blueberry cream cheese inside one of my favorite waffles ever. 

It was a great idea. 

I think you’ll like it too. 

Cream Cheese Stuffed Waffles

Ingredients

Directions

Begin by making the waffles according to directions, and by making up a batch of the blueberry sauce, also following directions.  Set the blueberry sauce aside, and place the prepared waffles onto a griddle heated to 200 degrees. 

Meanwhile, whip the cream cheese until light and fluffy.  Stir in ~1/3 C of the berry sauce. 

Spread the berry cream-cheese mixture over one side of the waffle.  Then, top with another hot waffle.  Repeat with all other waffles, until you have filled all of them (this recipe makes 4 stuffed waffles).  Keep the cream-cheese filled waffles on the warm griddle until ready to serve.

Top with additional berry sauce and enjoy!

Serves 4-6 people. 

Tuesday, January 7, 2014

Recipe Make Over: Christmas Eggs Lightened Up

To kick off the new year, I wanted to share one of our favorite recipes lightened up.  This recipe comes from my husband’s family: Christmas Eggs.  Cheesy, bacon goodness made extra creamy with sour cream. 

This year for Christmas, I tried tweaking the recipe a bit (you always hate to do that with a family favorite) to see if I could make it a little better for you. 

We swapped Greek yogurt for sour cream, Canadian bacon for some of bacon, and used less but more flavorful cheese. 

We loved the result.  Still creamy and cheesy – a hearty and filling way to start the day.  You can easily double this recipe to feed 5+ people; this recipe feeds 4. 

Lightened Up Christmas Eggs – Adapted from FJiMK 

Ingredients

  • 6 eggs
  • 1/4 C milk
  • pinch of salt
  • dash of pepper
  • 1/8 tsp. parsley
  • 1/4 C plain non-fat Greek yogurt (we used Fage)
  • 2 strips of bacon
  • 3-4 pieces of Canadian bacon
  • 1/4 C extra sharp cheddar cheese

Directions

Lightly grease an 8x8 baking dish and a large skillet.  Whisk together 6 eggs and 1/4 C milk.  Mix in salt, pepper and parsley.  Cook eggs over medium heat until they are nicely scrambled and just about set.  You don’t want to overcook them and dry them out since this dish will later be baked. 

Stir in 1/4 C Greek yogurt, and then place the eggs in the bottom of the 8x8 prepared pan. 

Dice up the bacon and Canadian bacon into small bits.  Cook the bacon over medium-low heat until crunchy.  Drain and discard bacon grease.  Then, in the same skillet, fry up the Canadian bacon pieces. 

Top the eggs with the bacon and Canadian bacon crumbles. 

Cool to room temperature and cover; refrigerate overnight if you plan to  make the eggs in the morning.  If not, continue on in the instructions. 

Top the eggs with shredded extra sharp cheddar cheese. 

Then, bake at 300 degrees for 15-20 minutes until warmed and cheese is melted.  If you are baking the dish in the morning, place the dish in an non-preheated oven and bake following the above directions. 

Serve warm. 

Related Posts Plugin for WordPress, Blogger...