Showing posts with label Mom's Kitchen. Show all posts

Thursday, March 20, 2014

Happy Birthday to My Cooking Inspiration!

Today is my mom’s 60th birthday. 
I am so thankful for her, in so many ways. 

But, the more and more time I spend in my kitchen, the more and more thankful I become that she took the time to teach me (and my sister) how to cook.  That’s a legacy she passed on to us from her mom, and for that I am grateful

Thanks to her, I knew the aroma of freshly baked bread in the oven, the steam on your face from peeking at a kettle of simmering soup, and the sneaky spoon or finger dip into delicious cookie dough (or frosting, for that matter)!

I learned how to shop for ingredients, price out items and compare nutritional contents from her.  Nearly all of my best kitchen tips come from her.  And, I learned how important it is for a family to cook and eat together.

And, of course I learned, how to enjoy good food and how to share it with others.

My mom is an outstanding woman and has inspired me in so many ways in and out of the kitchen. 

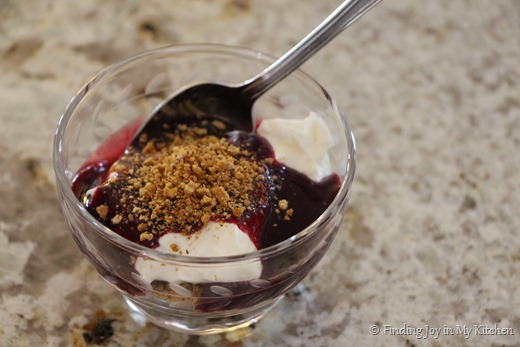
Happy Birthday, Mom!  Here’s some of your favorite dessert, just for you. 

IMG_0942

Wednesday, September 1, 2010

Mom's Whole Wheat Bread


I learned my love of from-scratch cooking from my mom.  When my sister and I were little, she used to make the most delicious whole wheat bread.  And, as little kids, my sister and I ate it without complaint -- even the crust.


I've found other bread recipes that I like, but this is one that I LOVE.  My mom pulled it out from the family recipe box a few weeks ago and made a loaf -- ever since then it has been making it as our weekly sandwich bread.


This bread is versatile -- I've made it in the bread machine {simply dump all the ingredients in based on the order suggested by the manufacturer; use the wheat setting and presto, you have bread}, made it by hand, and made it using my kitchen aid mixer!  It's worked wonderfully all three ways.


Soft.  Moist.  Chewy.

Yum.


Thanks, Mom, for pulling this recipe out!

Mom's Whole Wheat Bread - Mom
{Print Recipe}

Yields 2 large loaves


4 C white wheat flour
3 C red wheat (or "regular") whole wheat flour
3 tsp. salt
1/3 C honey
2 1/4 tsp. yeast
2 3/4 C warm water
1/4 C olive oil
*You may wish to add 1/4 C wheat gluten to the dough

To make the bread without a bread machine, begin by mixing the warm water and yeast together in a large bowl.  I used the bowl of my kitchen aid mixer.  Allow these ingredients to sit together for 2-3 minutes.

Then, add in the honey, salt and olive oil.

Next, slowly add the flour while you stir (or, while your mixer stirs).  Mix until all the flour is incorporated.

Knead for 5 minutes, until dough is smooth and elastic.  If you knead by hand, you may need to add a little more flour to prevent the dough from being sticky.  I used my mixer and didn't need to add any more flour.

Cover, and allow the bread to rise for about 1 hour (or until doubled).

Punch the dough down and then shape in to loaves.

Place the loaves in a lightly greased loaf pan, and cover.

Allow them to rise again for 30 minutes - 1 hour.

Then, bake at 375 for 30-35 minutes until crust is lightly browned and bread sounds hollow when lightly tapped.

Enjoy!


If you make it in the bread machine, you'll need to cut the recipe in half!

Photobucket

This recipe is linked to:

Tuesday, January 12, 2010

Kitchen Tip from Mom

During my time at home last week, my mom and I reminisced about the years when my sister and I were little kiddos. Mind you, they weren't all blissfully happy.... my mom used to lock herself in the bathroom just to get away from me.


I know... something that cute couldn't possibly have been a handful. Right.

One fond memory I have growing up was playing in the kitchen while my mom cooked. What I didn't realize was this simple trick (which occupied my sister and I for HOURS) actually saved my mom's sanity and helped her to cook meals from scratch even with two hooligans running around.

Today's kitchen tip is brought to you by my mom....
Create a drawer in your kitchen for your children. My girls had their own drawer to play in while I was cooking. I filled the drawer with a large sheet (which I would spread on the floor of my U-shaped kitchen), and a 5 qt. ice cream bucket filled with rice and all sorts of items to fill, pour, mix, measure and stir the rice with.
When it was time for me to be in the kitchen, I'd spread the sheet on the floor and let the girls play with the rice and all the gadgets. When dinner was ready, I had the girls put the items in the drawer, and I would simply pick up the sheet and funnel all the rice back into the bucket. It was a simple and easy clean up and the girls loved it. That drawer was a life saver.
I know this is one mandatory drawer that will exist in my kitchen when little sous-chef's make their way into our life.

Linked to:

Monday, January 11, 2010

Carrot Bread


Today, in another installment of "From My Mom's Kitchen", I have a very special guest I'd like to introduce you to.... my mom!!


My mom is an amazing cook! And, one thing I inherited from her is her love for bread....

I enjoy bread and bread baking probably because I grew up around almost everything being "home made". My mom made 6 loaves of bread every week and I remember taking it to elderly friends and neighbors and hearing their heartfelt appreciation to something homemade.
Slicing into a warm loaf, adding butter and jelly, what could be more comforting and tasty. Back then it was all white bread, which I still enjoy, but I really relish the taste and textures of many different breads. Along with bread making I have canned fruits and made spaghetti sauce as well as butchering our own meat and making sausage. I enjoy making cookies and candy, especially fudge (probably 8 different kinds) and have been making caramels from a secret family recipe for 30 years.


I enjoy hand made things in general and appreciate antiques. I also try to recycle as much as possible. I do lots of craft projects and most of them recycle something. I grew up in an era where nothing was wasted. It was refashioned into something else of use.
My kitchen tips: Don't be afraid to experiment or adjust a recipe. A freezer is a must for keeping food costs down and preparing meals ahead of time. I love my crock pot! Keep a well stocked kitchen and you are ready for almost anything -even a snowed in weekend.

One year I received a bread machine and we had a new favorite - Carrot Bread!


Carrot Bread - Mom
{Print Recipe}

Makes a large, 1 1/2 lb. loaf

3 1/4 C bread flour
2 tsp. salt
2 T dry milk
2 T butter
1/4 C grated carrots, 1 oz. ( I use baby food carrots)
2 T honey
1 C water
1 1/2 tsp. dry yeast

Follow the directions for your bread machine for order of ingredients etc.


I like this bread best with butter and honey.


You can likely follow these directions to make the carrot bread without a bread maker!

Thanks, Mom, for passing on your love for bread!

Linked to:

Sunday, January 10, 2010

Sweet and Sour Pork (updated)


I know I've mentioned before that my mom used to bake goodies for a craft sale she put on with two of her good friends (they had 50 crafters at their sale!!). One treat she made was pepper jelly.


If you've never had pepper jelly... I urge you to give it a try. It's quite delicious, especially on a cracker with a little bit of cream cheese!!

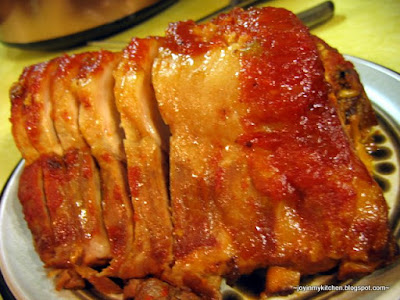
This fall, my mom made her batch of pepper jelly, but somehow crystals formed in the jar :( Never fear, her ingenuity led her to a great new meal... sweet and sour pork!


Sweet and Sour Pork - Mom

1 pork roast, 4-5 pounds
1 jar (about 6-8oz) pepper jelly
1 jar (small) chili sauce
1 medium onion, sliced

Slice the onions and layer them across the bottom of your crockpot. Set the roast on top of the onions (this helps prevent the meat from sticking to the bottom of your crockpot).

Then, pour the pepper jelly and chili sauce over the roast.


Cover and cook on low for 8-10 hours, until the internal temperature of the pork reaches the proper temperature.


Serve over rice, and use the juice as a glaze.


Delicious.


And, way better than eating out!

Linked to:

Saturday, January 9, 2010

Cinnamon Raisin French Toast

The first recipe in "From My Mom's Kitchen" was a recipe my mom made for my sister and I growing up... a delicious cinnamon raisin bread.


In response to the numerous comments and questions, here are some details that might help if you want to try making this bread:
  • The bread is for a 1 1/2 lb. loaf
  • You can make the bread by hand... just chop the raisins and knead them into the dough. Then, follow these directions:
To make without a bread maker -- mix water, dry milk, butter (softened/melted), sugar, yeast and salt in a large bowl. Stir to combine. Then, add in the chopped raisins and cinnamon. Add flour and knead until dough is smooth and elastic. Place in a greased bowl and cover, resting for 40 minutes, until doubled.

Then, shape dough into a loaf, and place in a greased bread pan. Cover, and allow the dough to rise for about 1 hour. Then, bake at 350 for 30-35 minutes until loaf is lightly browned and sounds hallow when tapped.
  • You can make this with golden or regular raisins.
  • You can make the dough in the bread maker and then bake as described above.
  • To achieve a non-dark crust, remove the bread from the bread machine a few minutes before it's done.
  • Store in an airtight bag/container to keep soft and fresh.
And, in case you're looking for a way to use up some of the pieces... try a yummy french toast.


Cinnamon Raisin French Toast - Mom

8-10 thick (think, Texas toast) slices of Cinnamon Raisin Bread
2 eggs
1/4 - 1/2 C milk
powdered sugar, to taste


In a medium, but wide bowl, lightly scramble the eggs and milk together.


Meanwhile, preheat the griddle to 300/350ish. Lightly spray it with cooking spray, if your griddle requires non-stick spray.

Then, slice your bread into thick slices... think "Texas Toast" style.


Using a fork (or your fingers), quickly dip the bread into the egg/milk mix, flipping to coat both sides.


The quicker you flip, the less "soaked" the bread becomes and the faster they cook. This prevents the center of the bread from becoming really "doughy" or "eggy" and harder to cook.

Place slices on the griddle and cook for ~3 minutes per side, until the toast is lightly browned and set.


Serve warm, topped with some powdered sugar.


Wednesday, January 6, 2010

Cinnamon Raisin Bread

This is the first in a series.... From My Mom's Kitchen!


My mom has taught me everything I know about cooking... well, almost.  But, she did instill in me a desire to cook frugally, healthily and with ingredients we already have on hand.  If you're nice to her, my mom might even write a guest post later this week!

When I was in middle school, my mom got a bread maker.


Our favorite breakfast bread was this delicious cinnamon raisin bread.


Yum.

Cinnamon Raisin Bread- Mom

3 1/4 C bread flour
2 tsp. salt
2 T dry milk
2 T butter
3 T sugar
3/4 C raisins
1/2 tsp. cinnamon
10 1/2 oz. water
1 1/2 tsp. yeast

Place all ingredients in your bread maker as listed by your manufacturer... except... add the raisins right away!  Your bread machine directions will tell you to add them later -- don't listen to them, listen to my mom.  She adds them right away.  This way they get all chopped up and add yummy raisin flavor throughout the bread.  The bread stays extra moist due to this too.

Bake according to directions (do not use the rapid cycle).

Allow to cool a bit before slicing -- if you can resist.


Stay tuned for a yummy french toast with this bread :)

Linked to:
Related Posts Plugin for WordPress, Blogger...