Do you need a quick and delicious salad for tomorrow's Memorial Day BBQ?
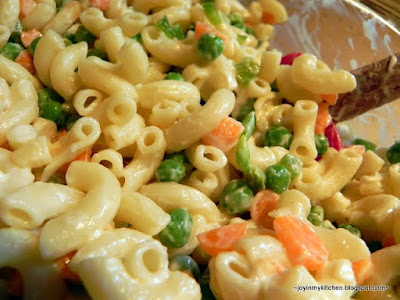
Frog Prince requested his mom's macaroni salad; he listed off the ingredients and I set to work. While the traditional macaroni salad has celery, we used green pepper in its place and I loved that switch.
This salad is easily made in 30 minutes and keeps well in the refrigerator. You might find that you'll need to add a bit more mayo the next day because the noodles will absorb the mayo as the salad sits - but the flavors mix wonderfully!
Macaroni Salad
14.5 oz box of macaroni (we used Ronzoni Smart Taste)
1/2 green bell pepper, finely chopped
1 C baby carrots, sliced
1 T minced onion
4 oz. frozen peas
1 C mayo (we used mayo made with olive oil)
1 tsp. sugar
1/2 tsp. dry mustard
1 T cider vinegar
paprika
parsley
sea salt
black pepper
Directions:
Cook pasta according to package directions; be sure not to over cook the pasta so that the noodles become overly soft.
Add the frozen peas in the last minute of cooking. Then, drain.
While the pasta is cooking, chop up the veggies.
Allow the pasta and peas to cool down and then place in a large bowl. As the pasta cools down, stir every few minutes to prevent the noodles from clumping together as they dry.
Add the chopped up veggies.
Stir to combine.
Add the minced onion, and stir these veggies in too. Alternatively, you can use fresh onion here.
Stir together the mayo, sugar, dry mustard, and cider vinegar until smooth and creamy.
Pour the mayo mixture over the pasta. Do this in small batches. Add a little, stir it in well and repeat. This way, the creamy sauce gets all over the pasta and you can stir it in well.
Stir in the mayo mixture until the pasta and veggies are coated.
Then, season, to taste with parsley, paprika, salt and pepper.
Cover and refrigerate until ready to serve. If desired, you can also add tuna fish or chicken (either canned or grilled chicken breast).
Enjoy!
Linked to: Melt in Your Mouth Monday, Tasty Tuesday, This Week's Craving, URS(2).