Showing posts with label Grill. Show all posts

Tuesday, July 1, 2014

Garlic and Onion Bratwurst

With the 4th of July just around the corner, now is a perfect time to share a delicious brat recipe. 

Beer & Onion Brats

For excellent flavor, these brats are simmered in beer, garlic and onion.  The end result is nothing short of the best bratwurst you’ve ever eaten. 

Garlic and Onion Bratwurst – Inspired by Michael and Leah

Ingredients

  • 1 package bratwurst
  • 1 medium sweet Vidalia onion
  • 1/2 tsp. minced garlic
  • 1/2 tsp. pepper
  • Pinch of paprika
  • 1 (12oz) can of beer

Directions

Begin by slicing up in the onion into wedges and then separating each wedge. 

Place the onions, brats, and garlic, pepper and paprika into a large stockpot.  Top with beer. 

Bring to a slow boil, and then reduce to a simmer.  Simmer for 15-30 minutes, covered.  Rotate the brats once during simmering. 

Remove from the pan and rinse any foam off the brats as needed. 

Place the brats on a grill that has been heated to medium.  Cook the brats on medium heat for 10-12 minutes, rotating 2-3 times during the grilling.  Cook until the skin is nicely browned and the internal temperature of the brats crosses 170 degrees (for pork-based brats). 

Meanwhile, keep simmering the onions until they are nice and caramelized.  Serve atop the brats. 

Beer & Onion Brats

Serve warm and enjoy! 

Tuesday, June 10, 2014

Garlic Lime Chicken

This tangy dinner dinner makes summer evenings a treat!  It’s super easy to make, and, if you don’t want to grill, you can always cook the chicken in a skillet in a mix of olive oil and butter. 

Garlic Lime Chicken – Adapted from Saving Dinner

Ingredients

  • 4 chicken breasts
  • salt & pepper
  • 1/8 tsp. paprika
  • 1/2 tsp. minced garlic
  • 1 tsp. minced onion
  • 3 T lime juice
  • 1/3 C chicken broth
  • pinch of cayenne pepper

Directions

In a small bowl, combine 1/3 C chicken broth, 3 T lime juice, 1 tsp. minced onion, 1/2 tsp. minced garlic, 1/8 tsp. paprika and salt and pepper to taste. 

Marinade the chicken breasts using the chicken broth mixture.  Sprinkle each chicken breast with a pinch of cayenne pepper. 

Allow the chicken to sit in the marinade for 1-hour (in the refrigerator). 

Preheat the grill to medium and grill the chicken for 25 minutes or so, until the chicken has reached 180 degrees.  Time will vary depending on the exact temperature of your grill and size of the chicken breast. 

Serve warm, with brown rice and steamed veggies.   

Friday, June 6, 2014

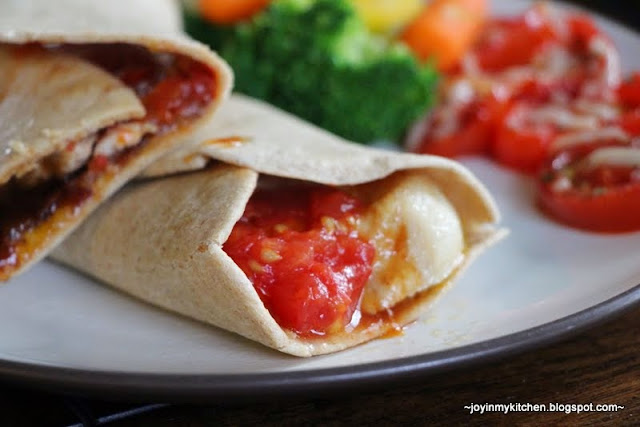
Monterrey Chicken Wraps

I find myself looking for lighter dinners to enjoy during the summer months when hot dishes and other heavy meals don’t go over as well. 

These chicken wraps are a new favorite. 

I’ve tried them on bread in a  grilled cheese of sorts, but somehow the wrap made the dinner just that much better for a summer. 

Monterrey Chicken Wraps

Ingredients

Directions

Begin by grilling or pan-searing the chicken tenders in olive oil.  If you have Smokehouse Maple seasoning, go ahead and season your chicken tenders with it; if not, just season it well with salt and pepper. 

When the chicken tenders have reached 180 degrees, place each in the center of a whole wheat tortilla.  Top with 1 strip of cooked bacon, a slice of extra sharp cheddar cheese, roasted tomato slices and top with BBQ sauce.  {note: you might want to melt the cheese on the tortilla first, if desired}

Roll up the tortilla and if needed, use a toothpick to hold the tortilla together if needed.  Slice in half to serve. 

Serve warm.  

Enjoy!

Friday, May 23, 2014

63 Memorial Day Recipes

Ahhh… I can almost smell the long weekend.  The weather has been picturesque and my grading is done; bring on summer. 

We are BBQing twice this weekend, and I thought I’d share some of our favorite recipes for the official start to summer. 

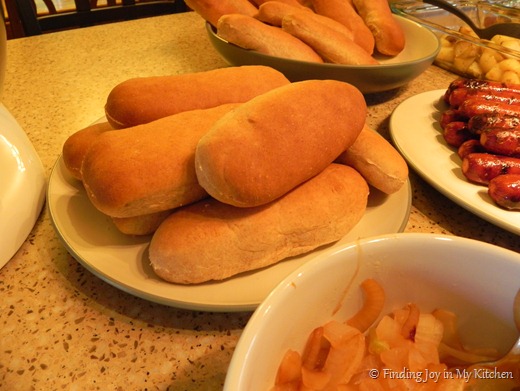
Must-have: 100% whole wheat hamburger & hotdog bun recipe (it’s ready in 40 mins!)

DSCN6633

Sides & Salads

Crockpot Baked Beans
Crockpot Ranch Potato Salad
Dill Dip & Veggies
Fruit Kebabs
German Potato Salad
Kale Chips
Mom’s Old Fashioned Potato Salad
Not-Your-Grandma’s Macaroni Salad
Roasted Parmesan Tomatoes
Roasted Potato & Green Bean Salad
Roasted Vegetable Summer Salad
Spinach Dip & Veggies
Tomato Cucumber Pasta {feeds a crowd!}
Wild Rice Pepper Salad
Zucchini Chips

On the Grill

Beer Brats
Cherry BBQ Grilled Chicken
Deconstructed Pizza Kebabs
Garlic Balsamic Crusted Chicken
Grilled Corn
Grilled Pizza
Grilled Potato Fries
Grilled Turkey Burgers with Garlic Spinach Sauce on Texas Toast
Italian Grilled Chicken
Portabella Mushroom Burgers
Roasted (or grilled) Asparagus
Tuscan Lemon Chicken

In Case of Rain

Easy Cheeseburger Tacos
Crockpot Italian Chicken Sandwiches
Crockpot Sloppy Joe’s
Crockpot BBQ Pulled Pork Sandwiches
Steak & Mushroom Sandwiches

Desserts

Blueberry Lemon Oat Bars
Brownies & Strawberries
Buster Bar Dessert {warning: contains peanuts}
Cheesecake Stuffed Chocolate Chip Cookie Bars
Cherry Ice Cream
Frozen Lemon Tart
Fruit Pizza
GF Brownies
Lemon Brownies
Lemon Raspberry Cream Cheese Coffee Cake

Raspberry Delight Dessert
Raspberry Frozen Yogurt
Raspberry Rhubarb Frozen Yogurt
Raspberry Rhubarb Shortcake {with a Greek Yogurt Pound Cake}
Rhubarb Bars
Rhubarb Blueberry Crisp
Rhubarb Cake
Rhubarb Dessert
Rhubarb Dump Cake
Rhubarb Gingersnap Cheesecake
Rhubarb Meringue
Strawberries & Brownie Truffle
Strawberry Cheesecake Ice Cream
Toasted Marshmallow S’more Bars

Condiments

BBQ Sauce
Cherry BBQ Sauce
Creamy Spinach Pesto {great for burgers or chicken}
Sweet & Tangy Refrigerator Pickles {aka Bread & Butter Pickles}
Refrigerator Dill Pickles

Monday, September 9, 2013

Deconstructed Pizza Kebabs

Looking for a fun and different end-of-summer dinner? Then I recommend deconstructed pizza kebabs. 

Easy to make, fun to eat, and great for leftovers.

Deconstructed Pizza Kebabs – Inspired by Erin of $5 Dinners

Ingredients

  • 4-6 Italian sausage links
  • Beer or water for boiling
  • 2 medium red/orange bell peppers
  • 1 medium green bell pepper
  • 1 sweet Vidalia onion
  • 8 oz. mushrooms
  • Italian seasoning (we recommend Mrs. Dash, salt free)
  • Cheddar cheese
  • Quick pizza sauce

Directions

Begin by boiling your Italian sausages.  You can do this either in 1 can of beer or in 2 C water.  Boil for 10 minutes, rinse.

Meanwhile, prepare your vegetables by cutting them into cubes about 1-inch in size.  Toss all of them in a large bowl and spritz with olive oil.  Season with salt, pepper and Italian seasoning. 

Spread veggies into a grill basket.  We typically line ours with tinfoil, lightly sprayed with olive oil.  Grill over medium heat for 20-25 minutes until veggies are crisp tender.  Stir every 5-6 minutes during that cooking time.   Sprinkle 1-2 T cheese over the top just before serving. 

Place the Italian sausages on a grill heated to medium.  Grill for 15 minutes, turning every 5, or until the sausages have a great grill look and are done in the center. 

Warm up your pizza sauce. 

To serve, slice up the Italian sausage links into rounds, serve with veggies and top with cheese and pizza sauce

Enjoy!

Tuesday, July 30, 2013

Grilled Steamed Mediterranean Vegetables

These have to be some of the easiest veggies to make during the summer!  Toss your favorite veggies into tinfoil and grill. 

No, seriously, it is that easy. 

Grilled Steamed Mediterranean Vegetables – Adapted from a newspaper clipping

Ingredients

  • 4 C fresh or frozen broccoli, cauliflower and carrot mix
  • dash or two of oregano
  • olive oil
  • salt and pepper
  • splash of balsamic vinegar
  • Ice cube (if fresh veggies are used)

Directions

Lightly grease the tinfoil.  Then, place 4 C frozen veggies into the center of the tinfoil.  If you use fresh veggies, than add 2 ice cubes to the veggies. 

Sprinkle with oregano, salt and pepper. 

Wrap up the veggies in the tinfoil. 

Place on the grill over medium heat for 5-7 minutes, then turn the package.  Continue grilling for 5-7 more minutes, or until tender. 

Open the tinfoil package and splash with balsamic vinegar. 

Serve warm. 

Enjoy!

Monday, August 20, 2012

Grilled Zucchini Parmesan Strips

If you are grilling in the coming week, and have zucchini, please take my word and make these delicious Parmesan strips. 

To prepare them takes minutes, and if you already have your grill warmed up, then adding these to your dinner is as easy as can be. 

Grilled Zucchini Parmesan Strips – Adapted from Recipe Roundup

Ingredients

  • 1 medium zucchini
  • Olive oil
  • Garlic powder or minced garlic
  • Parmesan cheese
  • Sea Salt

Directions

Begin by slicing the zucchini into thin, long strips.  Arrange them on a piece of tinfoil coated with olive oil. 

Season with sea salt, and garlic. 

Top with Parmesan cheese. 

Grill on the tinfoil  - either place the tinfoil on the grill directly, or place it onto a cookie sheet and place that on the grill.  We used a grill basket and that worked well too. 

Grill over medium heat for 10 minutes, taking care not to burn the bottom of the zucchini.  The cheese might get a little brown on the tinfoil, but that’s ok!

Serve warm. 

Thursday, May 24, 2012

Grilled Sweet Potato Coins

We love sweet potatoes around here – so this week, we decided to try them on the grill.  These will be a great accompaniment to our summer grilling. 

While they weren’t overly crunchy {sweet potatoes aren’t in general}, we really appreciated the taste – and the fact that we didn’t have to turn on the oven!

Grilled Sweet Potato Coins

Ingredients

  • 4 medium sweet potatoes
  • Olive Oil
  • Sea Salt
  • Garlic Powder, optional

Directions

Begin washing your sweet potatoes, and peeling them.  Then, prick the sweet potato with a fork a time or two.  Microwave the potato to soften it just a bit – about 1-2 minutes. 

Then, using a mandolin slicer – slice the sweet potatoes into thin coins.  Use caution here because the sweet potatoes will be warm!

Toss the coins with olive oil and sea salt.  Add garlic powder, if desired. 

Layer the sweet potatoes onto tinfoil and either place the tinfoil directly on the grill grates, or into a grill basket. 

Grill over medium heat, turning and/or checking after 5 minutes, grilling for 15ish minutes until potatoes are soft and lightly grilled. 

Note – the fries soften a bit as they cook and therefore flipping them can be challenging – use caution to avoid breaking.  But, if they do break – they’re still tasty!

Enjoy!

Tuesday, March 27, 2012

Homemade BBQ Sauce

With summer grilling season just around the corner, this is a recipe you’ll want to have on hand. 

With just a few simple ingredients, you will have yourself a delicious BBQ sauce.  We’ve been using this recipe now for months and LOVE it.  

While we love our Cherry BBQ sauce, sometimes it’s nice to have a less elegant taste in a BBQ sauce. You know, a BBQ sauce that everyone likes – even kids.  This recipe is simple and fits the bill for a traditional BBQ sauce. 

We have it tweaked to our tastes (read – not very spicy), so feel free to add to this base to make a BBQ that satisfies your family too.  It’s great on pulled pork or chicken, ribs, burgers and more! 

Homemade BBQ Sauce

Ingredients

  • 1 C ketchup, or 1 C tomato sauce + 2 T brown sugar
  • 2 T apple cider vinegar
  • 1 tsp. dried mustard
  • 2 T molasses
  • 1 T minced onion
  • 1/2 tsp. garlic powder or minced garlic

Directions

Begin by combining the 1 C ketchup or 1 C tomato sauce + 2 T brown sugar with 2 T cider vinegar and 2 T molasses.  Stir well.  Then, add in the 1 T minced onion, 1 tsp. dried mustard and 1/2 tsp. garlic powder.  Stir to blend. 

If you are using this as a marinade – say for pulled pork or chicken, go ahead and add it to your dish when the time is right.  If you’d like to use this one as a sauce – place the ingredients into a small saucepan, and heat them until the reach a slow boil, stirring often.  Heat for ~10 minutes.  Then, cool to room temperature, and pour into a storage container. 

Use right away or store refrigerated for 3-4 weeks. 

Related Posts Plugin for WordPress, Blogger...